

SKATEBOARDS AND SKATEBOARD RAMPS ARE DANGEROUS It is the responsibility of builders of skateboard ramps and users of skateboards to ensure maximum safety. Scott Cam received a letter from Luke Davis, who lives with his grandparents, asking for plans and instructions to build a skateboard ramp. Scott not only supplied the plans and instructions (see below), but he went to Luke’s place and they built the ramp together. Luke was keen to try out his new ramp, but first, Scott presented him with a gift from Burke’s Backyard: two sets of safety gear for use with the ramp. Each set consisted of a helmet, kneepads, wrist pads and elbow pads. As a thank you present, Luke presented Scottie with a signed Newcastle Knights football jumper.
Step by step instructions
The ramp must be sited on a flat, level base. You’ll need a friend to help (preferably an experienced builder). The frame can be screwed or nailed together. If nailing the frame together, Scottie recommends hiring a nail gun. (Warning: keep all power tools, and particularly nail guns, out of reach of children.)
1. First, order your materials. You will need: 6 sheets x 9mm ply (2400 x 1200mm), 7 sheets x 18mm ply (2400 x 1200mm)
Rafters: 35 of 70 x 45mm radiata pine at length 2400mm
Rails: 2 of 70 x 45mm treated pine at length 2700mm, 6 of 70 x 45mm treated pine at length 1800mm, 10 tubes of Maxibond glue (or similar), 200 screws x 25mm long, 2 x 2400mm lengths of 50mm dia. gal. pipe
2. Set out the template: take 1 sheet of 18mm ply and along the 2400 length, measure in and mark a point 500mm from the edge to mark the platform. Go to the diagonally opposite corner and mark a point 70mm. Take a piece of plastic conduit (see pic below) and from those two points, create the curve, remembering the curve must be flat at the 70mm point. (Thus it begins to flatten before the 70mm point – giving a nice transition curve to flat spot).
3. Use this piece as a template and cut 5 more. Take two of these and reduce the curve by the thickness of the rafter (45mm) and this frame will sit under the rafters. Cut the rafters at length 2364mm (this allows for the 2 x 18mm framing sheets to create an overall frame width of 2400).
4. Stand the four outside frames into position and on the bottom corners on the ground nail your first rafter. At the back corners, start framing timbers. The overall width of the frame is 2400mm. (Note: all the rafters have to be cut at length 2364mm – this plus the two 18mm framing sheets will create an overall width of 2400).
5. The frame should now be standing up. Each end of the ramp needs to be joined together using 70 x 45 rafters on edge. The two frames can be nailed together creating the flat spot in the ramp. Make sure the frame is completely square. Now you are ready to put the rafters on to create the curve. Space at 150mm centres.
6. The rafters need to be flush with the outside curve frame. The rafters are laid on the flat so that you see the 70mm face. When you get to the flat spot put the rafters on edge and the ground will support those rafters. They will still remain flush with top of frame.
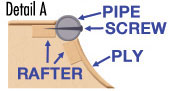
7. Cut out (see Detail A) 30mm x 30mm square from top corner of the curved frame and put a rafter either side. Sit pipe as detailed and screw to top rafter.
8. Now you are ready for the 9mm ply. Put glue (such as Maxibond) on the rafters and start at the top, butting the 9mm ply into the pipe and screw at 100mm centres across each rafter ensuring that the screws are countersunk and flush. Work your way down with you and a friend standing on the ply to create the curve. Repeat this until you get to the other end.
9. It’s a good idea to line the whole ramp again with another layer of 9mm ply, without glue. The top layer can be easily replaced when it gets damaged. (Tip: remember to add in a rafter where the sheets of ply join. The two sheets will be half on a rafter.)
10. Safety rails: take 3 lengths of 1800 pine and screw or bolt to the rear of the ramp and screw or coachbolt the top rail to these verticals. Repeat at other end.
A WORD OF CAUTION
1. Skateboarding can be fun but is inherently dangerous. Always warn the uninitiated and use protective gear.
2. The ramp should be carefully checked and tested before use. If your structure seems flimsy or to have weaknesses or faults, consult a professional builder.
3. Continue to check the structure regularly. There will inevitably be deterioration and good maintenance is essential.